How to upload raster data
🕐 Read time: 3 min
Written By Clark Yuan
Last updated 15 days ago
Overview
GeoTIFF RGB files — typically orthomosaics and aerial imagery exported from drone processing software — can be uploaded to and viewed on any Stitch3D Project with no software installation required.
💡 Make sure you have a Project ready. If you haven't created one yet, see How to create a Project first.
💡 Check out this LidarNews article on our raster sharing capabilities!
How to upload a GeoTIFF
The upload steps are the same for both Quickstart and Georeferenced projects.
Open your Project from the Projects or Dashboard page.
Click the Upload button in the top-right corner of the Project page.
Select Rasters file type.
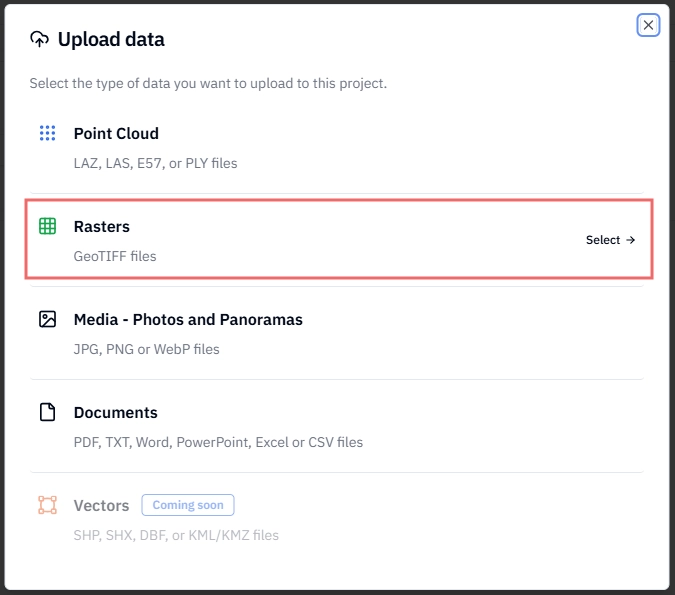
Select your
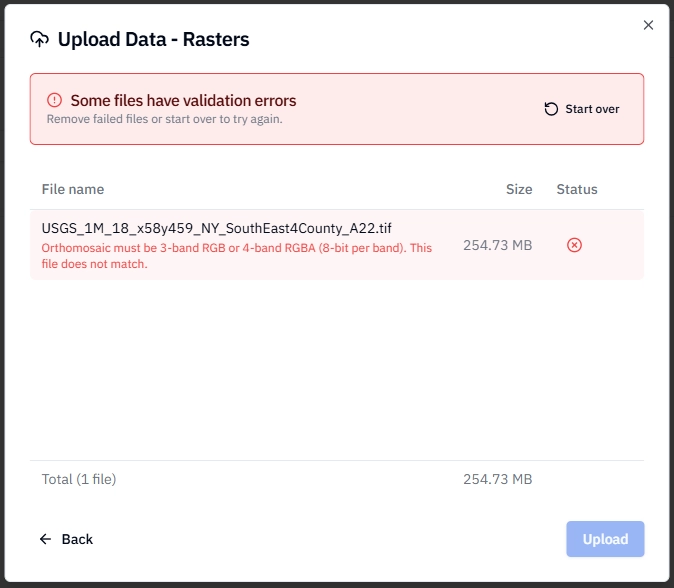
.tiffor.geotifffile by clicking to upload, or drag and drop it directly into the upload area.If there are no errors, click the Upload button. If there are errors, first remove the failed files then address the error message and try again.
Stitch3D processes your raster file(s) and adds it to your Project file list.
View the raster data by clicking directly on the file name or the View Project button (next to the Upload button).
✅ Confirmation: Once processing is complete, your GeoTIFF will appear as a layer in the Project and an email notification will be sent.
GeoTIFFs in Georeferenced Projects
In a Georeferenced Project, your GeoTIFF is automatically validated against your Project CRS on upload and reprojected if needed. This ensures your orthomosaic and point cloud data are always spatially aligned with each other in the viewer.
💡 Tip: For best results, export your GeoTIFF in the same CRS as your Project before uploading. Stitch3D will reproject it if the CRS differs, but starting in the correct CRS avoids any risk of reprojection error and speeds up processing.
What's supported
Stitch3D currently supports RGB GeoTIFF files for raster upload.
ℹ️ Note: Your GeoTIFF must include embedded CRS metadata for correct spatial positioning in the viewer. Most drone processing software (DJI Terra, Metashape, RealityCapture, Pix4D) embeds this automatically on export. If your file has no CRS metadata, it may not display in the correct location.
ℹ️ Single-band, multispectral, and DEM GeoTIFFs are not supported at this time. You can view DEMs by first converting the file to a RGB GeoTIFF file (not YCBCR).
⚠️ File Size Limit: 25 GB maximum
⚠️ Compression may cause errors: ZSTD compression has shown inconsistent results. Most common compression algorithms are supported, but DEFLATE is the most compatible option if compression is needed.